Latest Designer Sleeves Design Cutting And Stitching Tutorial
With so many wedding coming up this season you surely need a new dress to doll up in the marriage. Today we can get our inspiration from so many places on the internet if you are looking for something trendy and stylish this party season dive right in this article.
Be it your best friends wedding or your cousin’s wedding. If you are going to be a bridesmaid, then you for sure want to stand out of the crowd. It is the small details that make the significant differences. The way you carry your hair and makeup or jewelry with creating a great impact. But along with all this accessories what can make a real difference is the pattern of your outfit.
In this article, we are going to talk about the different sleeves pattern that is gorgeous, and you can so easily stitch them at home with the smooth video tutorial provided with it. The style that is mentioned below will make you stand out!
Let’s learn together how to make beautiful sleeves that you can attach to any Anarkali, gown or even tops. Yes! This style is so much in trend
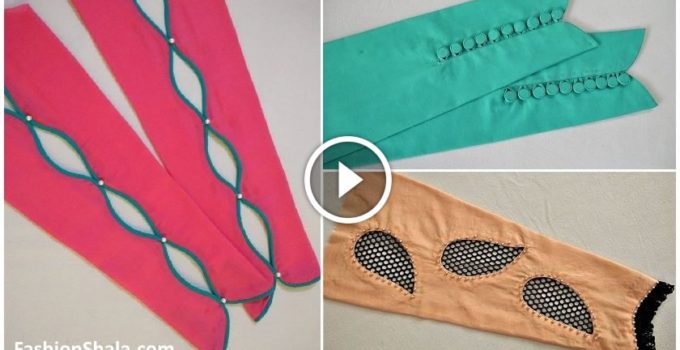
Unique Sleeves (Baju) Design Cutting and Stitching For Blouse/Kameez/Suit
All you need to do is:
- Take a cloth you want to make the sleeve of.
- Fold the cloth in half.
- The breadth of the cloth should be wider than the size of hand and the length can be according to your choice. You can make it half or full sleeves.
- Make sure you keep the cloth a little extra because that extra part will be used in stitching.
- Mark the cloth as shown in the video.
- After marking, cut the cloth, so that you get some idea about the shape of your sleeves.
- After cutting, Again mark the cloth from the middle. The mark should be at least 1 inch future from the middle area.
- Now vertically, mark the cloth at the distance of two inches. Leaving at least half a inch at the top for stitching purpose.
- After making two inches of mark, draw the design zig-zag curve as shown in the video.
- Make sure that the design you make is perfect and then cut it carefully.
- Now, take another cloth of contrast color to join the design and make it aesthetical.
- Cut the another cloth at least 2 inches wide and start piping on the 1st cloth.
- Start the piping with the sewing machine and carefully do it till the end. Don’t keep the piping too loose or too tight.
- The piping should be in the perfect shape. It is a little difficult because of curved shape, but you can make it fine by referring to our video.
- Again repeat this on the another the side to make the complete piping and to prevent the shape from spoiling.
- According to the size of piping that you need, again fold the contrast cloth and stitch it with using the sewing machine.
- After doing this, you are now almost there. Remember the two inches marks? Now cut them and join both the side of design by needle and thread.
- You can use your favorite motion or button or any piece that you like and attach it in between to completes it look.
Read More: Blouse Back Neck Designs for Bridal Sarees
This is another latest sleeves design.
Latest Sleeves Design With Making Button Cutting and Stitching
- Take two cloth as you will be needing two sleeves for both your hands and place it upon each other by keeping the outer i.r front side inside and inner side outside.
- Double fold the cloth you want to make sleeves of and choose the length that suits you the best.
- Keep the length of at least one inch long because you will need that for stitching.
- For the width, keep at least one and a half inch extra than the width of your arms for the same reason.
- As shown in the following video-
- We have kept the width 7.5 inches for the arm size of 6 inches and for length we have kept it 18.5 inch.
- Now, put an mark at 3-inch lengthwise and draw the curve to make the design. For help refer to the video.
- For width, put a mark at 10 inches and then 2 inches for stitching.
- Now, Join the 3-inch mark of the long side and 2-inch mark at the width side and join them properly by drawing a slant line.
- After joining the two dots cut the slant line you drew, and also cut the corner a little.
- This way, your design is like almost made. Now open the cloth and you will get a dome shape design at the top. You are doing well till now.
- Cut the dome shape a little by half an inch to make the design perfect. And don’t forget to put a cross mark at the outside so that we don’t get confused which side is inner side or which side is outer side.
- AT the width side, put a mark of 1.5 inches and join it by drawing a curve shape towards the 10-inch mark done earlier. Remembered the 10-inch wide mark.
- Now, after marking that 1.5 inches again, put a mark at 5.5 inches leaving that 1.5-inch mark. It will make a total of 7-inch mark.
- Cut the curved that we made. And also the cloth Cut till 7-inch mark from between.
- Now take another 7.5*7.5 inch of cloth for the design of sleeves and keep it just like we kept the previous material.
- Mark the square fabric same as the previous cloth. Please refer the video for better understanding (time 4.30 min) And cut it.
- Now open the cloth and cut from between. After that cut at least half inch wide in the same shape.
- That half inch strap is very important after you have cut the strap, put that strap on the previous cloth and start with stitching.
- Arrange the cloth inside out and fold the strap in half and again stitch it, when you reach to the top, fold the ends as shown in the video and continue sewing. This is done that the strap does not move from its place. And you get a robust Outcome.
- Yay! You are now almost done.
- All you have to do is make Dori (a thick thread like thing). If you don’t know how you make Dori don’t worry, we have provided a video tutorial on the same, click here.
- Cut the Dori into 2.5 – 3 inches as per your wish. You will need at least 6-8 Dori for one sleeve. Making it a total of 12-16 Dori for both the sleeves.
- Fold the Dori in half and stitch it at the middle curve of the design. Make sure that the hole is big enough to hook a button.
- Take another small cloth and sew it on the opposite side if the design where we stitched the dori. This is for attaching the buttons.
- Now open the dori side and attach both . This is going to look so pretty.
- Now, to make buttons, take a cloth of the same color and a button small enough to fit the Dori. Put the button onto the fabric and twist it tightly and stitch it with needle and thread and circle it at least 5 6 times to make it tough.
- Repeat the same procedure for all the buttons.
- Now just like we stitch any button, in the same way, you have to sew all the buttons and close it with the Dori (half oval shape).
- The final result that you get is worth the time you put in this!
Read More: 14 Winter Hair Care Tips With Home Remedies
The design that you are going to learn here is so beautiful and also my favorite of all the three designs. It has some cuts, some pearls, and some contrast and attractive colors.
Stylish Sleeves Designs Cutting and Stitching for Blouse/Suit/Kameez
Let’s learn how to make this sleeves
- As all the above design, 1st step is the same.
- Choose the cloth you want. Take the length that suits you but keep in mind that you have to keep it at least 1 inch extra for the stitching purpose.
- In this, we have kept the sleeves 19 inches.
- The same things apply to the width also. Keep it at least 1.5 inch extra.
- In this, we have kept the width of sleeves 8 inch.
- Make a 3 inch on the width side and make a curve shape.
- At the length side, mark at 5 inches and now join that 5-inch mark and 3-inch mark with a slant line.
- Now cut all the markings. After cutting them, again on length side put a mark at 1 inch and cut it in a slant towards the end.
- You can watch video tutorial for better understanding.
- After doing all the cuts open up the cloth and cut the dome shape at least 1-inch short making is a little less curvy.
- To make a beautiful design, take a paper and start making the design of your choice and size. Here we are making a leaf-like design, and we have cut the paper.
- Now take the sleeves and fold it in half towards the back and mark it.
- Now we will open the sleeve and put the design a half inch below the end on the middle that we just marked. For better outcome, we have set the design a little slant. You can use your creativity and make the design attractive.
- Copy the design on the cloth and then again to make the same design leaving 2-inch gap in between both the leaf shape. Put the leaf in the opposite direction to make it look attractive.
- Be careful while placing the design. Repeat the process and create the third design leaving a 2-inch gap in between.
- Now copy the same thing on the other sleeve.
- We have to take now another cloth that is very thin in size like lining fabric and put it below our main cloth. If you don’t have cloth that big enough don’t worry, take a cloth that will cover the leaf-like design part. We want something in the background of the design.
- Put both the clothes on each other and stitch the design with a sewing machine. Make sure you do it carefully. Now cut the design in proper shape. Do it for all the designs. And cut it from the ends so that you can easily fold the cloth inside out.
- Now fold the extra lining cloth that you have use and lock it by stitching it with needle and thread. It will prevent the threads from coming out.
- Take another strap of the same color and cut the strap in the same shape of the end of the sleeve and cut it and stitch it with the sleeve. Fold it towards inside and sew it from inside.
- Now take a net for any other designer cloth of your choice and put it below the design.
- You will need as many nets as the designs on the sleeves.
- Place the net below the design and stitch it from below. Avoid keeping it tight or loose as it may destroy your design. Keep the cloth normal. Cut the extra net. Repeat this process for all the design.
- Take a strap of the same net and place it at the border of the sleeves.
- Now stitch it by making the small plates, to make it look a little flowy like jalar.
- Now we have decorated it with white pearls. You can use something like diamond or colorful gems as per your choice, and you are now ready to attach it with your dress!
We hope that you find this article useful! All the patterns mentioned above are very trendy, and you will surely get some appreciation for the efforts that you will put. Now go and start with making the sleeves and tell us how it turned out.