Press "Like" to follow us
DIY Designer Baby Frock Cutting & Stitching Tutorials
Long lost are the days when our mothers use to surprise us with customised hand stitched frocks. In today’s world, we lack that sense of personal touch pertaining to a huge increase of online stores and our busy lives. No matter how far we reach, nothing can beat the fond memory of that customised dress that we used to own. But we can bring those trends back again.
By following these easy DIYs, we can also hand down our little ones a unique outfit.
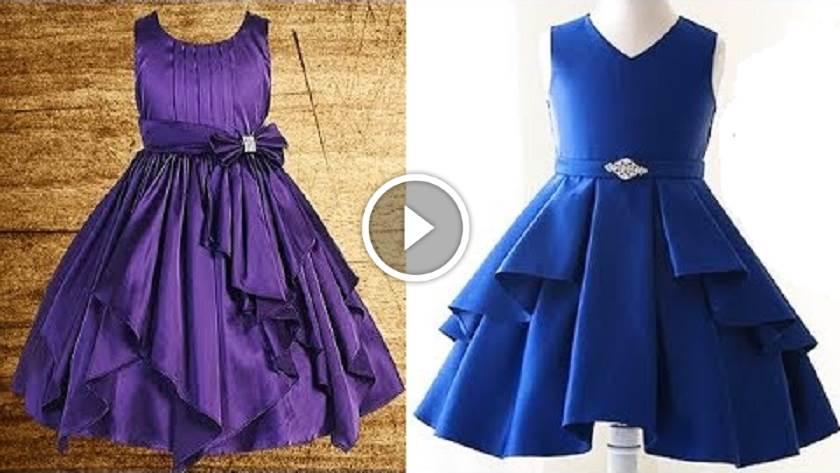
1. Designer Baby Frock Cutting & Stitching
- This frock is ideal for 7-8 years old baby girl.
- Take a 3-meter satin fabric.
- Make a 4-fold of it. Make 5-inches mark for shoulder (back portion) on side [A]. Mark a point of 5inches perpendicular to the previous one of the arm-hole. Join both the points.
- Mark a point on 8 inches from adjacent side[B] touching the previous made point. Join it.
- Take a 7 inches mark on another side[C] which is parallel to side[A] at the distance of 12 inches. Give a round shape for armhole at the bracket.
- Take 2.5-inch broadness for neck on [A] side and length of 3 inches on [B] side. Join these two points in a round manner. Cut the outline that we are left with. Sew it with the base fabric and it inside out.
- For the front part, take a rectangular piece of cloth. Mark its centre and start make 2 box pleats of 1-inch from that point towards the edges. Sew it to lock in place.
- Now place the back cut out part over it, trace the back part on the front part and cut it accordingly.
- For bottom part, take another piece of fabric in 4-fold of length 24 inches. Place the top part alongside to make the broadness. Extend this marked point diagonally till the length. Draw a rough round shape at the end. Cut this outlines part. Sew it with a base fabric and turn it inside out.
- Sew the front & back part together.
- Keep this bottom cut out part in a triangular shape in 2-fold. Now keeping the upper part diagonally on it.
- Make a line where it matches the breath with the triangle. From that line, mark another rounded line at the distance of 22- inches. Outline two diagonals meeting at the centre of this line from the middle of the adjacent sides. Cut it out. Repeat the same with another piece of fabric.
- Fold their borders.
- Make a gathering on both these parts. And sew it on the other base fabric of front part.
- Sew this with the upper part and turn it to the wrong side for fitting. Sew it at 1-inch difference from the edges.
- Turn it inside out.
- Add a bow at the belt part and it’s done.
2. Cascading Ruffled Baby Frock Cutting & Stitching
This frock is ideal for a 3-5 years old baby girl.
- Take a 3 m long plain fabric and fold it 8 times.
- Chalk out the shoulder portion on the fabric at 5.5 inches apart from one [A] end, and mark the armhole at 6 inches from the adjacent [B] side of the previous end[A]. Join both the points. It will be making a straight line forming a bracket [C]. Make a semi-circle here, for the armhole.
- For the chest portion, chalk out a mark of 8 inches near [C]
- For top part, measure 13 inches from [B] to its opposite side [D].
- Mark 7.5 inches on [D] as the waist broadness. Let this mark be called as [E]. Join [E]&[C].
- Mark a point 2.5 inches on [B] for neck’s breath and 5 inches on [A] for neck’s length. Mark a point at 3 inches on [A] for the back. Join the neck’s length[A] to the breath point in a V-form. Join the neck’s length[A] to the back point in a round form.
- Cut the fabric over the boundary lines we made. Keep the inner part and discard left-overs.
- We will be left with 4 pieces of folded fabric, out of which we will separate 2 for the back portion & the other 2 will be for the front portion. Cut the 5 inch deep neck part on the front 2-layered fabric.
- Do a two hold on it.
- Sew them together & turn it inside out.
- For the bottom part, take two-fold fabric, place the previously cut out portion adjacent to it. And make marks of an elongating frill. Cut out accordingly.
- Sew it with the bottom part.
- Take another piece of fabric (24×35 inch). Fold it into 2. Cut off in a semi-circle form.
- Fold the above fabric into a triangular form and wherever it measures 10 inches, mark it and measure 18 inches ahead of it. Draw a round shape. Cut it.
- Spread it, mark a 10 inch and start drawing a line diagonally. Cut it out. Form pleats on it & sew with another similar piece on a bigger fabric which has block pleated on it.
- Sew the top part of it with the bottom part and then sew the back part to it. And we are done.
3. Flower pattern Baby Frock Cutting & Stitching
This frock is ideal for 3-4-year-old baby girls.
- Take cotton fabrics of 3 meters (bottom part) and half meter (upper part).
- Make a 4-fold of the front fabric (length=12 inches). Make 4.5-inches mark for shoulder (back portion) on side [A]. Mark a point of 5 inches perpendicular to the previous one of the arm-hole. Join both the points.
- Mark a point on 8 inches from adjacent side[B] touching the previous made point. Join it.
- Take a 7 inches mark on another side[C] which is parallel to side[A] at the distance of 12 inches. Give a round shape for armhole at the bracket.
- Take 2.5-inch broadness for neck on [A] side and length of 4 inches on [B] side. Join these two points in a round manner. Cut the outline that we are left with.
- Place this portion on a net fabric. Trace it and cut it. Repeat it for the back part. Sew it together with base fabric. Stitch both front and back part together as well.
- Take the net fabric for sleeves in 4 fold (length=14 inches), mark a point at 3 inches on side [B]. Draw the desired shape of sleeve on it and join it. Cut it. Spread the fabric out and we will have 2 sleeves.
- Attach these sleeves to the upper stitched part in a frilled manner.
- For the bottom part, take the fabric in 4-fold. Mark 2.5 inches on side [B] and 4 inches on side [A]. Draw a round shape joining both. From this point, mark a point on 18 inches on side [B], 21 inches on side [A] and 20 inches in the middle. Draw a round shape joining all these points. Cut this outline.
- Make a frilled out lower part and attach in to the bottom part which will turn out to form a flower, as shown in this video.
- Stitch it with upper part and we are done.
Let your creativity run wild and add various personal touches to these frock for customization.
How to Decorate Kurti Front Neck