
20+ Amazing Ideas to Reuse Old Shirts To Use Again In Fashionable Way
Do you have clothes that you don’t wear because they are old fashioned or don’t look good on you or because of any other reason? Well, everyone has a bunch of them, that’s why we are here. So, Don’t worry we got it covered, with little bit of twist and touch to your old fashioned clothes that you don’t wear can turn your clothes into a completely different style.
In this article we are going to you show some effortless tutorials and ideas on how to make your boring old tops and t-shirts interesting. These are basically “DIYs” which mean “Do It Yourself”, Therefore it’s pretty clear that you can do them by your own at home with no complications at all.
Old Shirts can be turned into stylish dress with little creativity. Go through amazing tutorial to get an idea.
1. Off-shoulder top into a spaghetti top
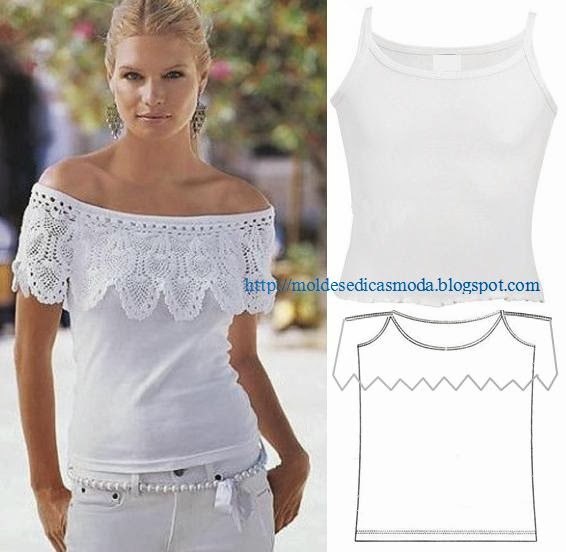
This white off shoulder top has very broad lace on and to turn this into spaghetti :
- First remove the broad lace from the top.
- After that give that spaghetti top a final touch with stitching. That’s all, there you go!
You can always style the spaghetti top by wearing a shrug or shirt on it, to make it look cool. Or you can simple wear this spaghetti top and add a heavy neck piece to make it party wear.
2. Normal girls T- back top into a cut back top

Let’s turn this normal t-back into a cut back funky top, the steps are very easy.
- Take top and scissors.
- Now make cuts at the back of too using scissors.
- Be careful while making cuts.
- You can make cuts according to your choice.
In the given picture the cuts are made completely from top to bottom.
You don’t need to wear anything over it because that will cover the pattern at the back. Also, the top is already fancy, although you can always add hoop earrings that are quite trending.
3. Plain T-shirt into a casual white Lacey top
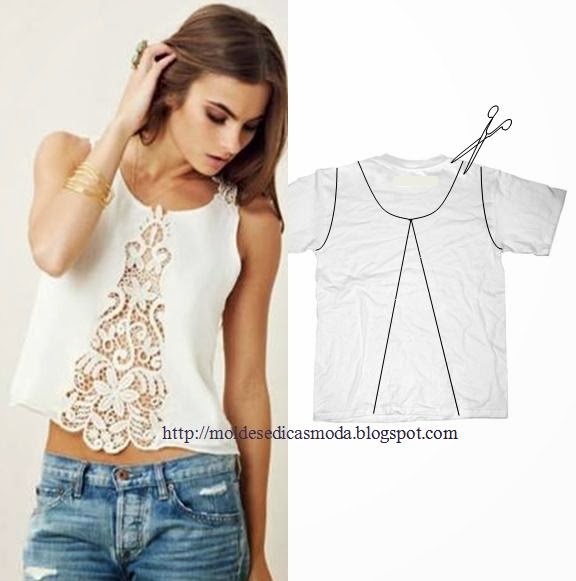
- We will need one plain t-shirt, lace matching to the t-shirt, and scissors.
- Remove the sleeves from the t-shirt using scissors.
- Now, cut an “A” line pattern in the center of the t-shirt, as given in the picture.
- After doing the cutting part, attach Beautiful matching lace on the center of the t-shirt.
3. Normal spaghetti into a criss -cross pattern
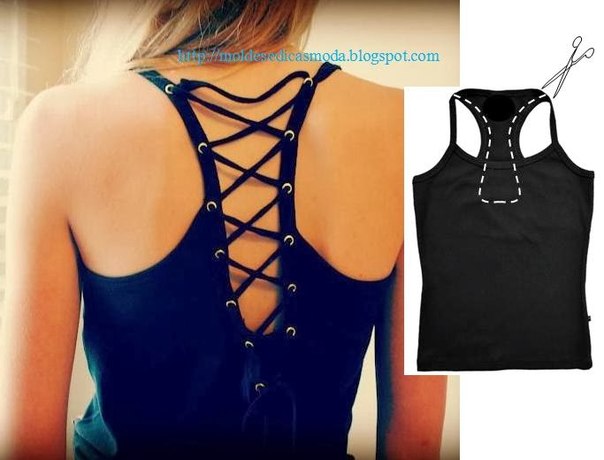
- Take the spaghetti and cut down the “T” part from the spaghetti using scissors.
- Now take a lace and attach it at the back as shown in the above picture.
- since the lace is attached in a criss cross manner, we call it a criss cross back pattern.
4. Sleeveless T-shirt into a Lacey top
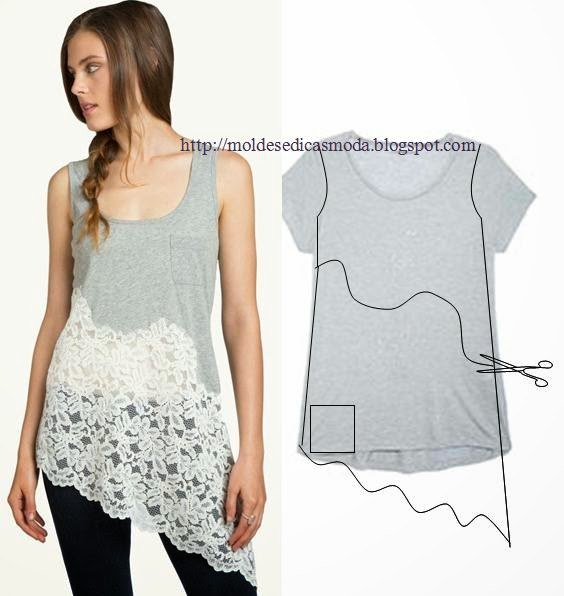
- Cut a random design over the top.
- In the above picture we have cut a wave type of design on the top,make sure you do it carefully.
- Next step is the important step where we will attach the lace on the top.
- You can choose any design, any lace for your top
5.T-shirt into criss cross shoulder top
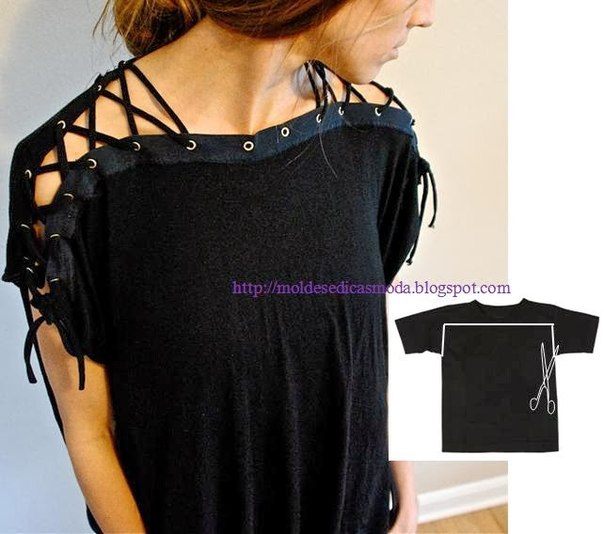
Criss cross these days seems to be in trend, also its a basic way of styling. follow the procedure:
- Take any simple T-shirt that you want to turn in a top.
- Remove the upper part which is neck and shoulders of the T-shirt carefully.
- After that you will fancy or simple laces of your choice to add them on the top of our T-shirt
- Attach the laces in a criss cross pattern.
well,that’s it.
6.T-shirt into flowy jacket
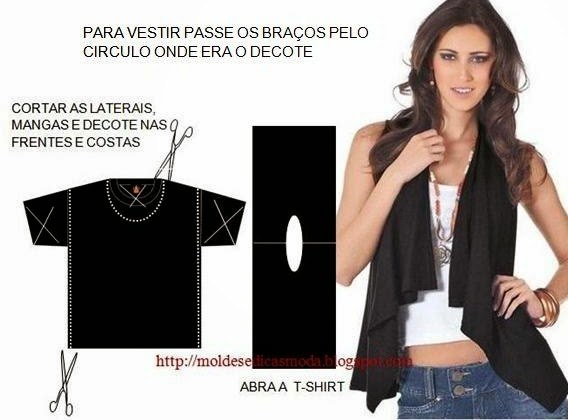
Wearing shrugs makes you look you made efforts on styling your clothes, but in real its extremely effortless. if your wardrobe doesn’t have a shrug, make your own shrug of your choice. Here is the process:
- Cut down the sides of the T-shirt and the neck panel as well.
- This is all you need to do, now wear this flowy jacket by putting it around your neck.
- Then putting both of yours in that one whole.
You should prefer a T-shirt that is large in size, larger the size better the jacket.
7. T-shirt into top

There are various ways to use laces in your top one of them is adding lace to the upper part of the top.
- Take the shirt and cut down the upper part as shown including neck,sleeves and shoulders.
- We will take the lower part and just add lace on it to complete the top.
Its the easiest way of adding lace to your top, Lace makes it party wear when you do not want to show off your skin too much.
8.T-shirt into fringes top
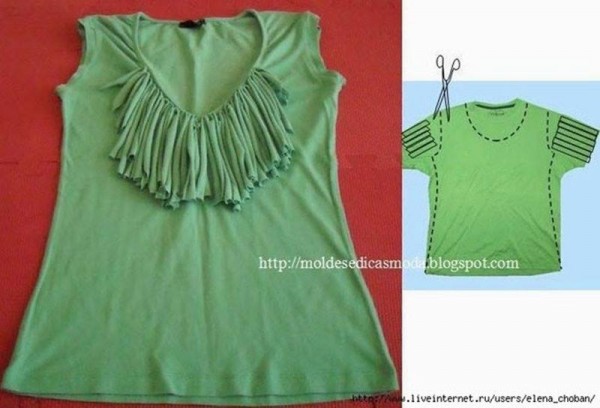
- Cut down the sleeves of the T-shirt which you decided for DIY.
- Do not throw away the sleeves, instead cut them into fringes as shown above.
- Use the fringes for your top by adding them around the neck f the top.
You can try different pattern for neck if you like.
10. simple T-shirt into contrasting sleeve top
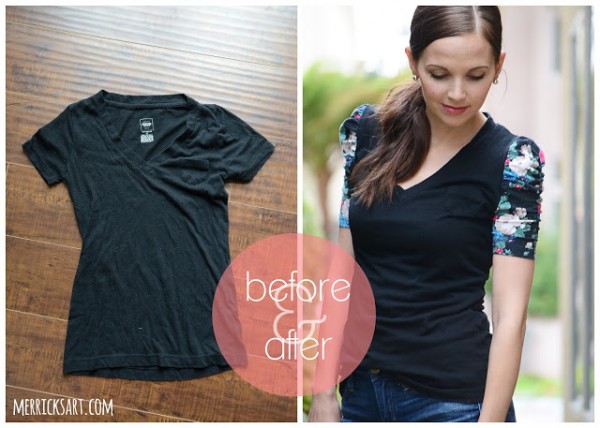
We see that contrast is everywhere in this world, be it life or clothes. So, for this tutorial we are going to make a T-shirt with contrasting sleeves. Process:
- Take two T-shirts, contrasting two each other.
- Here, in this tutorial we have on plain V neck T-shirt and the other one is a floral T-shirt.
- Now, remove the sleeves of floral T-shirt using scissors and attach those sleeves to the plain T-shirt.
The top is ready, in this tutorial we just switched the sleeves, if the process confuses you even if a little bit, click on the link that is given below for better understanding.
Merrick’s Art – Contrasting sleeve top tutorial
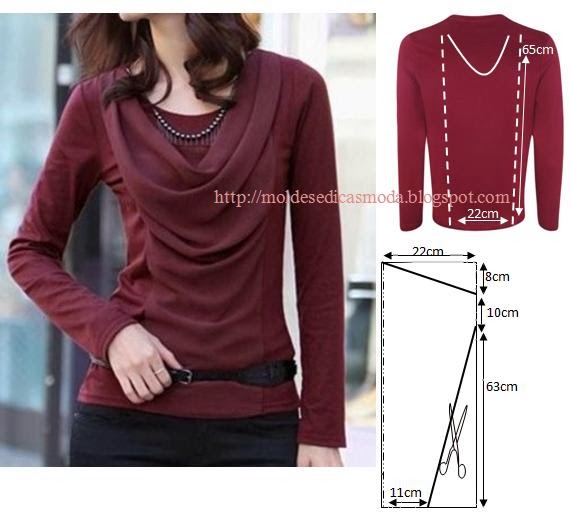
11.Simple T-shirt into fancy top

Just another styling with the lace, here the top has lace only on sleeves and less than half on the backside of top
There is no lace in front of the top, as shown in the above image.
Here are the two very simple steps:
- Remove the sleeves from T-shirt and cut the back accordingly using scissors.
- Now, just add lace by stitching.
Here the T-shirt was grey in color where the lace was attached of blue color.
Again you can choose any color and T-shirts.
That is the best thing about DIYs.
12. Two T-shirts in to one stylish top
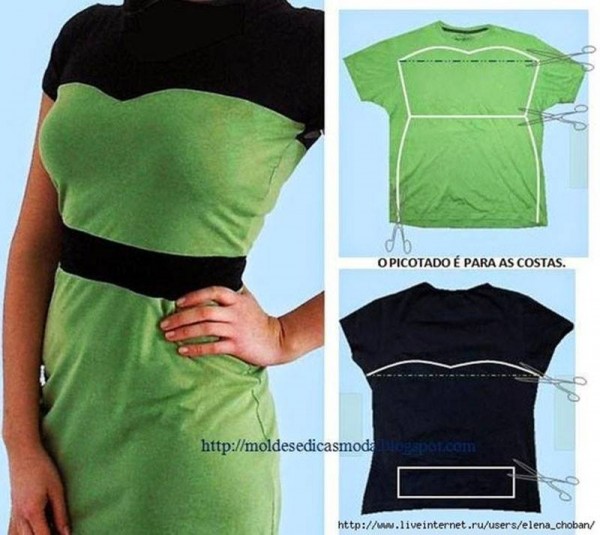
For this we need two T-shirts of different colors, here we have on green and blue T-shirt.
- First, take the green T-Shirt which will be treated as the base for the top.
- Now, draw the pattern on the green T-shirt and cut it down accordingly, you can look at the picture above to understand the pattern.
- Take the blue T-shirt from which we will cut the upper portion and belt type pattern.
- We will use the belt and upper portion of blue T-shirt and attach it on the green pattern which we cut in the second step.
- We are done and the top is ready after attaching both of them.
This is just combining two simple T-shirts in to a stylish top.
13. T-shirt into a Top with wings design at the back
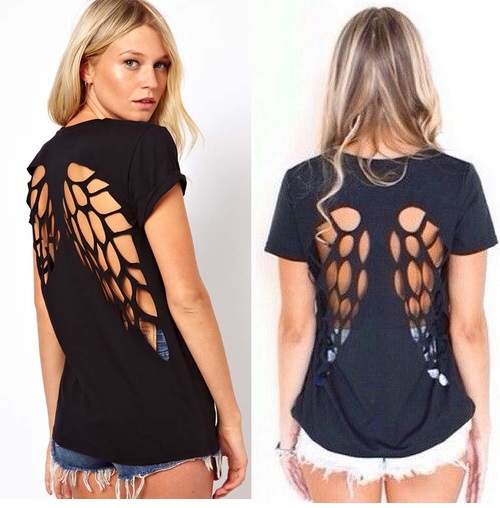
Every girl is an angel in her own way, create your wings.
In this tutorial we will make a pattern of wings at the back of T-shirt.
- Take the T-shirt and first draw the shape of wings at the back.
- Now, cut according to the shape of pattern carefully with scissors.
- Also, you can make holes like the picture above, to make it look cooler.
That is all,may you travel through life on the wings of angels.
OMesewcrazy – One Shoulder Ruffle Shirt Upcycled
14.Full sleeves T-shirt into one shoulder ruffle shirt
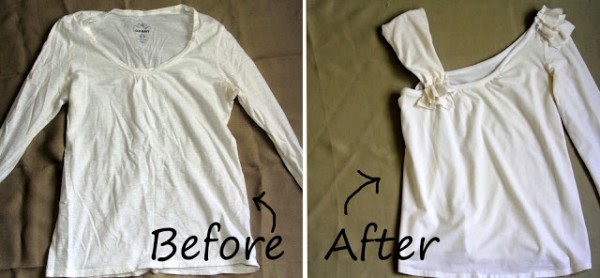
- Take the T-shirt and cut down one shoulder from the T-shirt.
- After removing the shoulder use that piece of cloth.
- Now, make a sleeveless shoulder from that piece of cloth.
- Then, attach it back to the Top.
It is slightly confusing, and to clear that out, you can click on the link given below.
OMesewcrazy – One Shoulder Ruffle Shirt Upcycled
15. T-shirt into Cool top
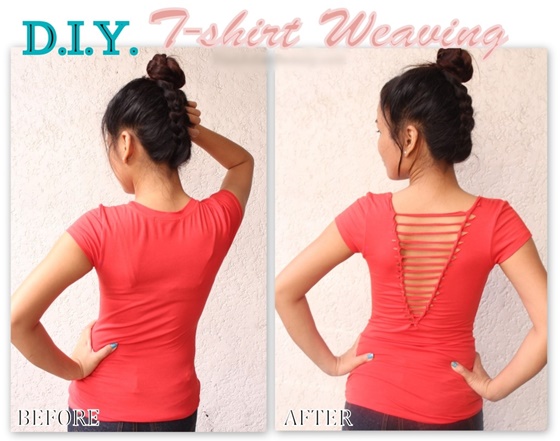
- Remove the neck panel from the back of T-shirt.
- Now, double fold the back of T-shirt.
- Draw a “V” at the back of the T-shirt.
- Mark cuts carefully with scissors,
- Now, the final and last step is to do the weaving with the strands and the process of weaving is given below in the link.
16. T-shirt into a knot top

Take a large sized T-shirt to make a one shoulder knot top.
- Remove one shoulder from the T-shirt and sleeves from the other side.
- Now, just make cuts from one side of the T-shirt into strips.
- Tie the strips, as you like, tie the knots tight if you want a top with nice fitting or keep it loose if you wish to.
For better understanding, the steps are given in detail click on the source.
17. T-shirt with fringes
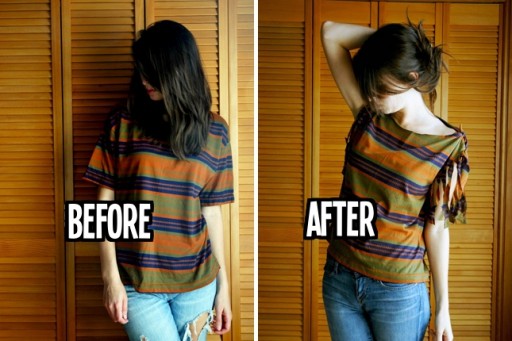
- Here we will take a T-shirt with stripes, you can take any T-shirt you like.
- First cut a curve on both the shoulders of the T-shirt.
- Now, tie a knot on the shoulders, as given below in the pictures.
- After that cut and make fringes on the sleeves of the T-shirt, it is totally cool if they are not equal.
- There you go with your T-shirt that has some cool sleeves, the before and after picture of this T-shirt perfectly explains how DIYs work.

Via: howtoinstructions
18. Simple neck T-shirt into braided neck T-shirt
The T-shirt with braided looks absolutely nice, one must try this one.
- Take the T-shirt, no worries if it is wrinkled, because it add ups to the style of the braided neck.
- Now, we need to make slits, on the T-shirt, carefully mark slits on the whole neck.

- After, that braid the loops of the T-shirt, the method of braiding is given in the link attached below.
Source: bigdiyideas Top.
19. Apron from shirt
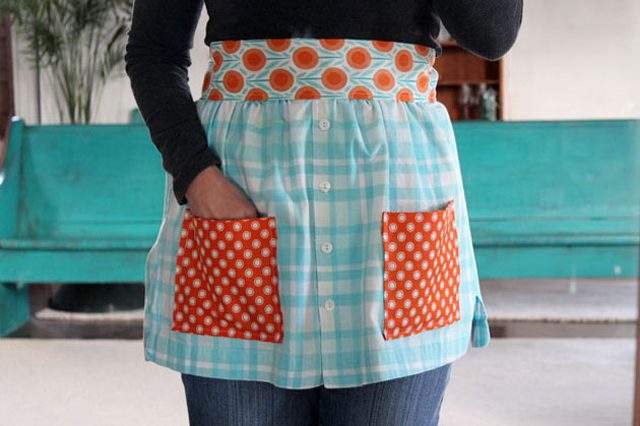
You do not need to buy an apron if you have an old shirt and if you are reading this article, because this tutorial is about creating your own apron from a simple shirt. The process as well, is just so easy you must want to try. Let’s get started
- Here we have on blue and white checks shirt, now cut the shirt into by cutting out the upper part of the shirt.
- We will only use the lower part of the shirt.
- Taking two different and colorful cloth.
- We will now use one cloth to make the belt of the apron, by stitching them.
- Using other cloth to make pockets and attaching them on the apron and that is all we need do.
Source: ehow
20. Normal T-shirt into work out T-shirt

Right clothes while working out are important because work out clothes not only motivate you but also make you feel great about yourself.
This tutorial is important one because it is nothing about casual wear or party wear, it is about work out wear from normal T-shirt.
- Try and prefer the T-shirt which have some quotes or slogan written on it, just like here we have a T-shirt that says “EAT MORE RABBIT FOOD”
- Starting with removing the neckline and bottom hem of the T-shirt.
- Now, remove the sleeves as well.
- After that cut a “V” at the back of the T-shirt.
- Use the bottom hem which we cut in the second step.
- Tie the back straps of the T-shirt with that bottom hem.
You can change the length of the T-shirt as per your requirements, if you want it short, cut it from bottom, if you wish for a long T-shirt, use a T-shirt with larger size in this tutorial.
Source: rabbitfoodformybunnyteeth
21. Every day white T-shirt into a cut back top
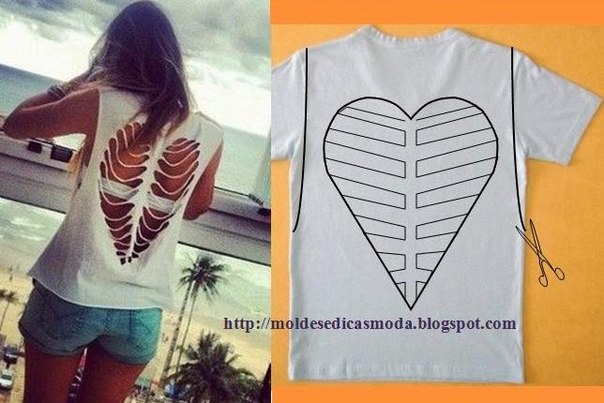
This one is quite is similar as the second DIY, but what makes different is the heart shape at the back. follow the steps:
- Take the T-shirt and draw a hearts shape with cuts on it.
- Cut exactly the same pattern with scissors.
- and there you go with your cut back top.
You can style it with shorts or anything that suits you well, also you can try different shapes if you do not wish to make the heart pattern behind the back.
DIYs can be done for anything whether it is for aprons, fancy clothes or work out clothes, you just need to find the right way of doing it. Also it is not even time consuming, so the above mentioned DIY tutorials you just read about, will save your money and time both at the same time. Not only that but DIY clothes make you look creative and stylish as well.
Do not forget to try them, wont take much time.
Thank you for reading.