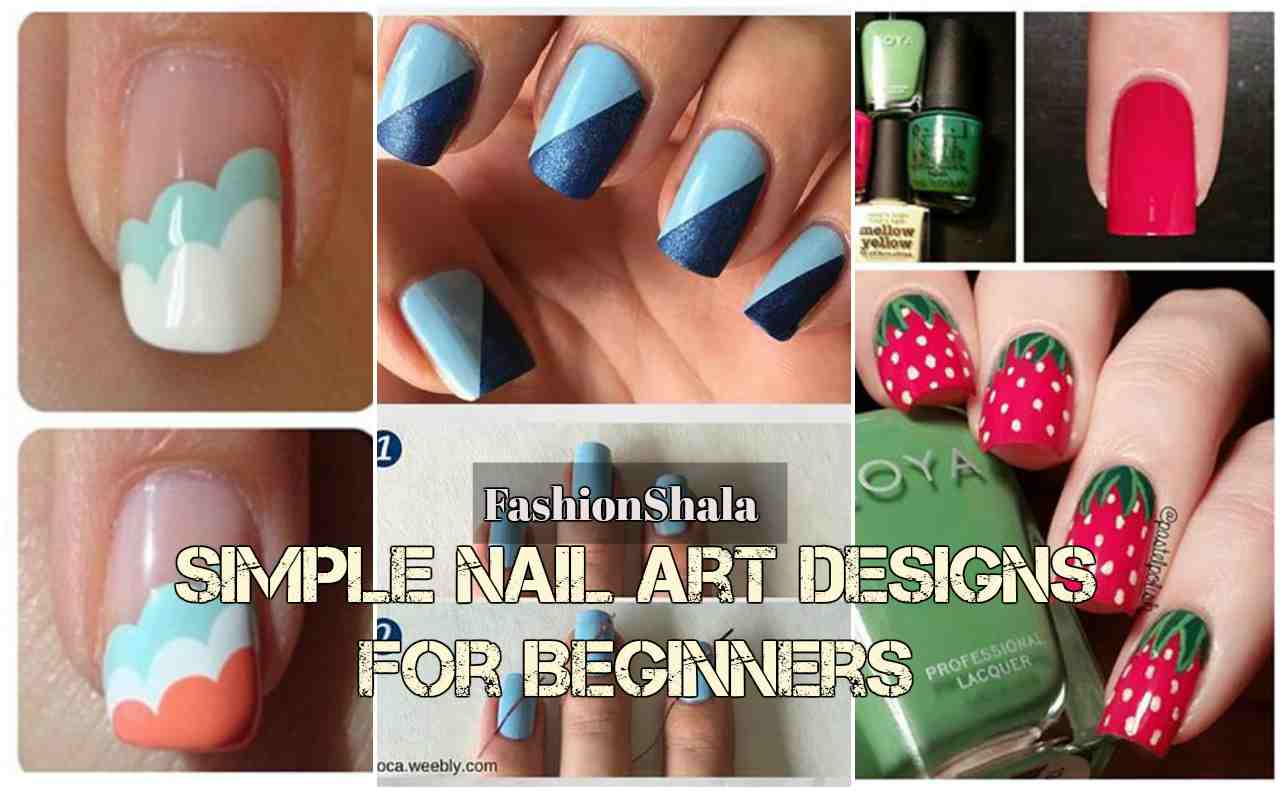
Amazing Nail Art Designs in Simple Steps
Designer outfit from head to toe, all fit and perfect but chipped nails, how does that sound??? Super gross right. I know. Don’t worry, we got you covered.
We ladies do so much to enhance our beauty. Sometimes it is vigorously painful as well. Extensions, lip fillers, surgeries and so much more. Keeping aside the pain it costs us our money and time as well.
The same thing goes for the nails. Nail art can really jazz up any outfit. But that doesn’t mean you have to spend hundreds and thousands on it. We are here to share with you some simple broke girl tips which you can follow to achieve those glammed up nails.
So without further ado, let’s begin!
14 Nail art step by step tutorial
Four-Leaf Clover Nails
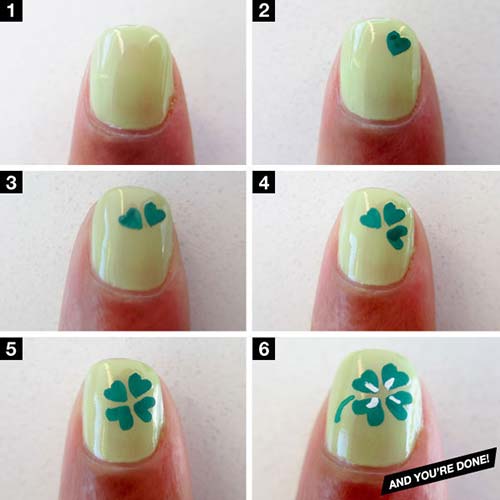
This nail art design is so peaceful right?? The darker and lighter shades of green is so soothing and calming. Moreover the four clover leaves have a significance. It brings good luck. This reason is enough to recreate this art. Let’s see how you can achieve this perfect summer art.
Things you need:
- A greenish yellow nail polish.
- A green nail polish.
- A white nail polish.
- A thin brush.
- A clear nail polish.
Steps:
- Start by painting your nails with the greenish yellow nail polish as your base coat.
- Use the thin brush and start making the leaves as shown.
- Dip the brush in white nail polish to draw the mid section as shown.
- Let it dry and finish it off with a clear nail polish as the top coat.
Two-Toned Blue Nail Art
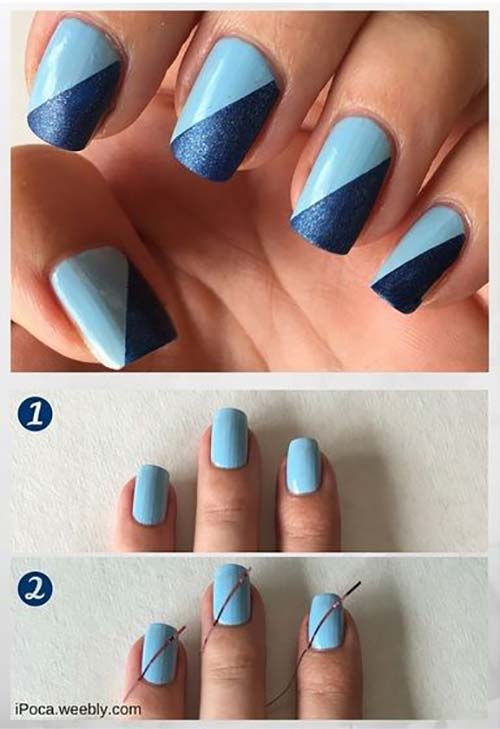
Now you don’t have to buy dual toned fake nails. You can achieve this super classy and sassy nails right at your home. Let’s see how to do this.
Things you need:
- A light blue nail polish.
- A dark blue shimmer polish.
- Nail art strips.
- A clear nail polish.
Steps:
- Paint your nails with the light blue nail polish. Apply two coats.
- Place the nail strips diagonally over your nails.
- Paint the section with the shimmery blue polish.
- Let it dry and finish off with clear polish.
Strawberry Fields Forever Nails
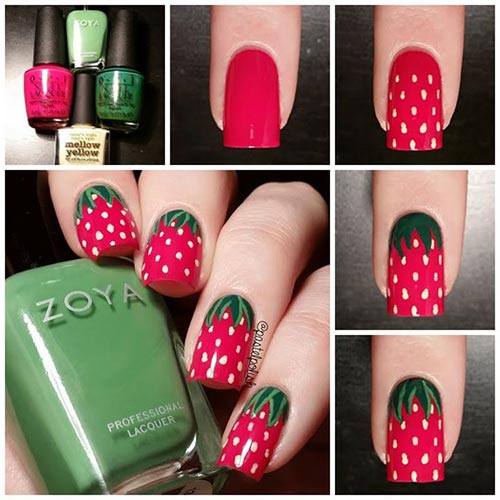
These nails are just so delightful to see. They are so fruity and fresh. These nails look so youthful and full of happy vibes. Let’s see how you can upgrade your monotonous red nails to something quirky.
Things you need:
- A red nail polish.
- A light green nail polish.
- A dark green nail polish.
- A Mellow-yellow or white nail polish.
- A thin brush.
- A clear nail polish.
Steps:
- Start by painting your nails with two coats of red nail polish.
- Use a thin brush to create the dots all over with your yellow or white nail polish.
- Take the brush again and draw the strawberry head at the bottom of the nails with the dark green nail polish.
- For a more lively effect outline it with light green nail polish.
- Top it up with the clear polish and you are done. Voila!
Deep Blue Nail Art
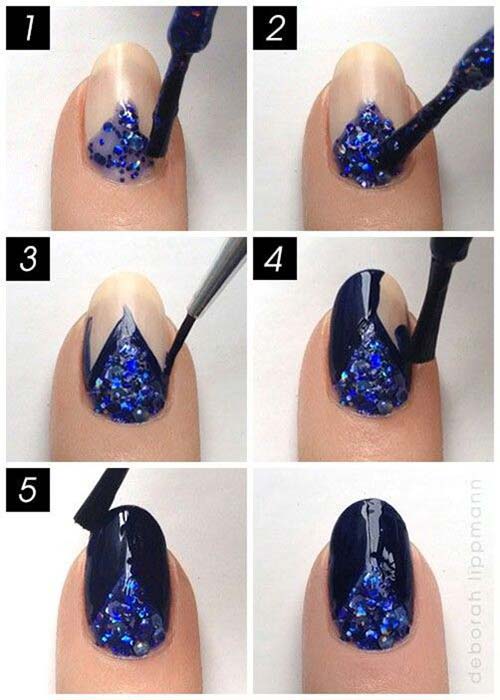
This is a perfect design for all your late night festive parties. This can instantly glam up any outfit. It has got the right amount of oomph to it. Let’s see how to do this. Just one to you can do this with any colour you like.
Things you need:
- A dark blue nail polish.
- A blue glitter nail polish.
- A black nail polish.
- A thin brush.
- A clear polish.
Steps:
- Paint your nails as a clear polish for your base coat.
- Take the blue glitter polish and apply it on you nails in a triangle shape as shown.
- Take a thin brush and border your shape with a black nail polish.
- Paint the rest of your nails with dark blue nail polish.
- Top it off with a clear nail polish.
Valentines Nail Art Design
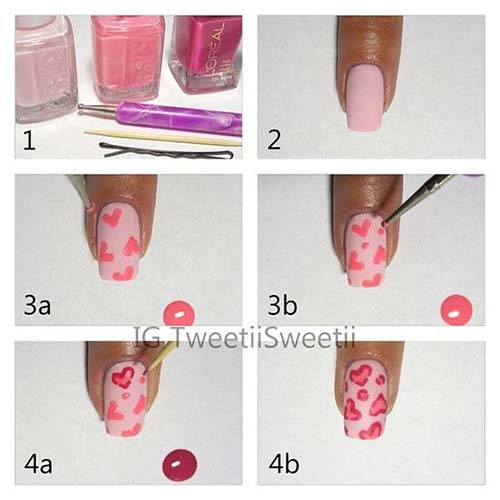
It is already January and Valentine’s Day is just round the corner. This nail art is perfect to add up to your Valentine’s feel. The colour and the hearts are just perfect for your mood.
Things you need:
- A light pink nail polish.
- A dark pink nail polish.
- A nude pink nail polish.
- A dotting tool or Bobby pin.
- A toothpick.
- A clear nail polish.
Steps:
- Paint your nails with two coats of nude pink nail polish.
- Use the dotting dool or Bobby pin to create some hearts and dots using the light pink shade.
- Border the hearts and dots using the darker pink shade with the help of a toothpick.
- Finish off with a clear polish and you are all set.
Triple Cloud Nails
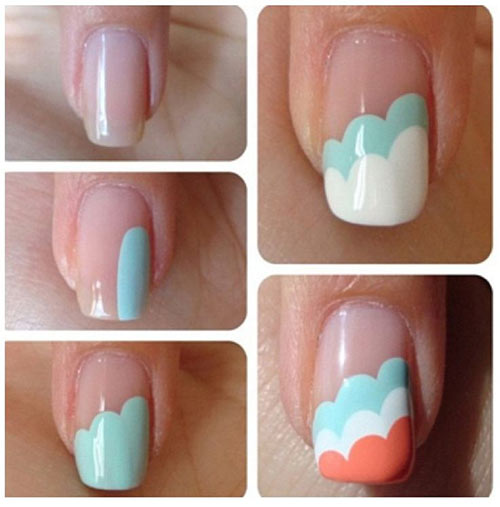
Here comes the super cute summer clouds. Aren’t these colours bright and beautiful?? These pastel colours will prove that you are so following the trend. So let’s see how you can upgrade your basic French Manicure to these colourful clouds.
Things you need:
- A light blue nail polish.
- A white nail polish.
- A pastel orange nail polish.
- A clear pink nail polish.
- A thin brush.
Steps:
- Apply two coats of the clear pink nail polish as your base coat.
- Take a thin brush and draw vertical lines of blue nail polish in the shape of clouds as shown.
- Repeat the same with white and orange nail polish and shown.
- Finish off with a top coat to set it.
Scales Nail Art Design
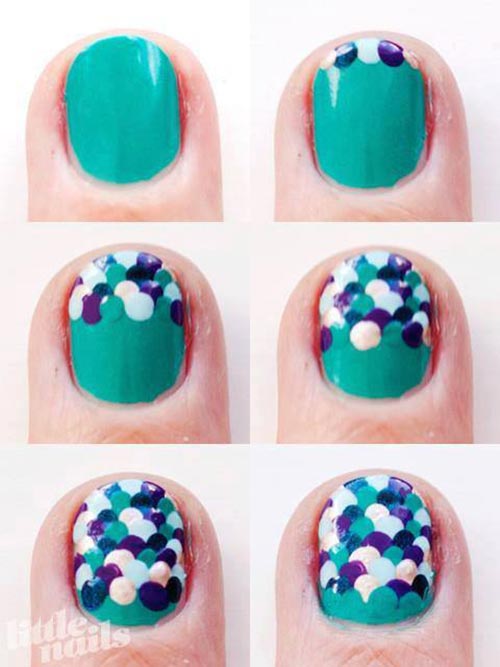
It’s time for something fishy on your nails! Don’t get all confused and stinky. I am talking about this scaly nail art. It is all so bright and blazing that you can’t stay away from it. So if you want to add some extra charm to your nails, let’s get started.
Things you need:
- An aqua-green nail polish.
- A nude nail polish.
- A white nail polish.
- A puple nail polish.
- A dark blue nail polish.
- A thin brush or Bobby pins.
- A clear nail polish.
Steps:
- Start by painting your nails with two coats of aqua nail polish.
- Start making few dots with the other colours with a thin brush or Bobby pins as shown.
- Cover your entire nails 8n this scales pattern.
- Finish off with a clear nail polish.
You can use any colour of your choice to create this art.
Lavender Circles Nail Art
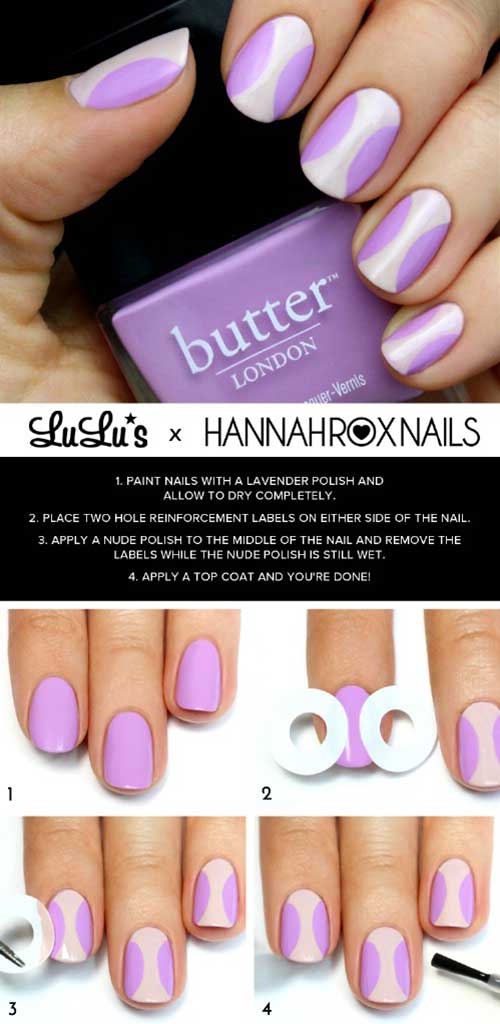
This is a super artistic and trendy nail art. The softer pastel hues makes it perfect for any day time occasion. This can instantly add a pop off colour to any of your monotonous outfit. Let’s see how to do this.
Things you need:
- A lavender coloured nail polish.
- A nude beige nail polish.
- Round hole nail art stickers.
Steps:
- Apply two coats of the lavender nail paints your base coat.
- Paste two round hole nail art stickers on either side of your nails as shown.
- Fill in the gap with nude beige nail paint.
- Coat it with clear nail polish to set it and you are all done.
Leopard Print Nail Art Design
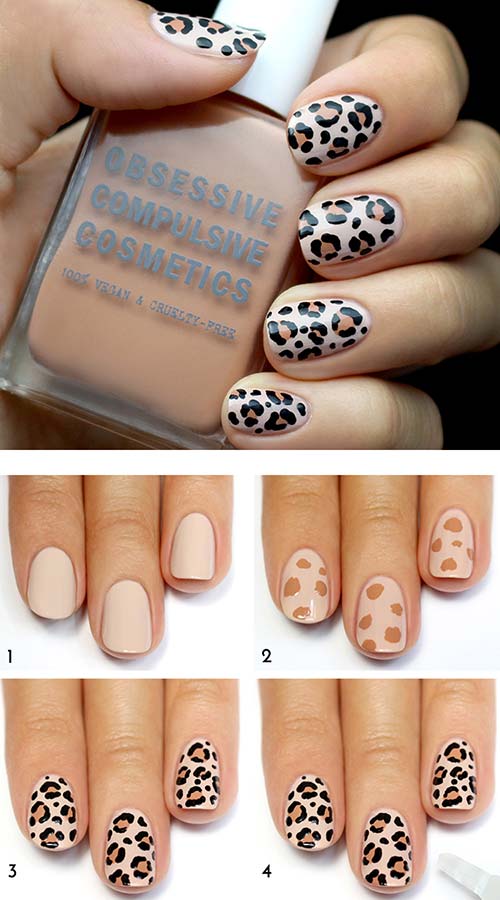
This print is all over. From dresses to bags, from footwear to sunglasses. Then why not on your nails??? This super cute and trendy nail art is going to help you showcase the wild side of you. Let’s do this.
Things you need:
- A nude nail polish.
- A light brown nail polish.
- A black nail polish.
- A thin brush.
- A clear nail polish.
Steps:
- Apply two coats of the nude nail polish as your base.
- Take the brush and draw some designs with the light brown nail polish over it as shown.
- Border the designs with black nail polish.
- Finish off with a clear nail polish and you are all set to roar!
Musical Notes Nail Art
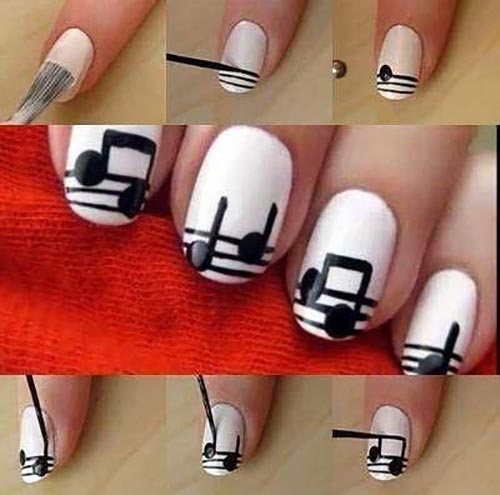
This is for all you music lovers out there. Showcase you talent with these pretty little musical notes. Unique as it is, it is lovely as well. Let’s see how you can do this.
Things you need:
- A white nail polish.
- A black nail polish.
- A thin brush.
- A dotting tool.
- A clear nail polish.
Steps:
- Start by applying two coats of white nail polish as your base coat.
- Take the thin brush and draw three stripes with the black nail polish.
- Use the dotting tool to create the dots as shown.
- Draw the musical notes with the brush.
- Finish it off with clear nail polish.
Red And White Polka Nail Art

This is a super cute and super girly nail art design. The colours are really bright and fresh and youthful. Who else feels like Asian girls seeing this art?? I know I do. Let’s see how to do this.
Things you need:
- A white nail polish.
- A bright red nail polish.
- Nail strips.
- A dotting tool or toothpick.
Steps:
- Start by painting your nails with white nail polish as your base coat.
- Place the nail strips diagonally as shown and paint your nails red.
- Pour some red nail paint on a clean surface.
- With the help of a dotting tool or toothpick make some dots over the white area.
- Finish off with a top coat and your own trendy polkadot nails are ready.
Yellow Grapefruit Nail Art
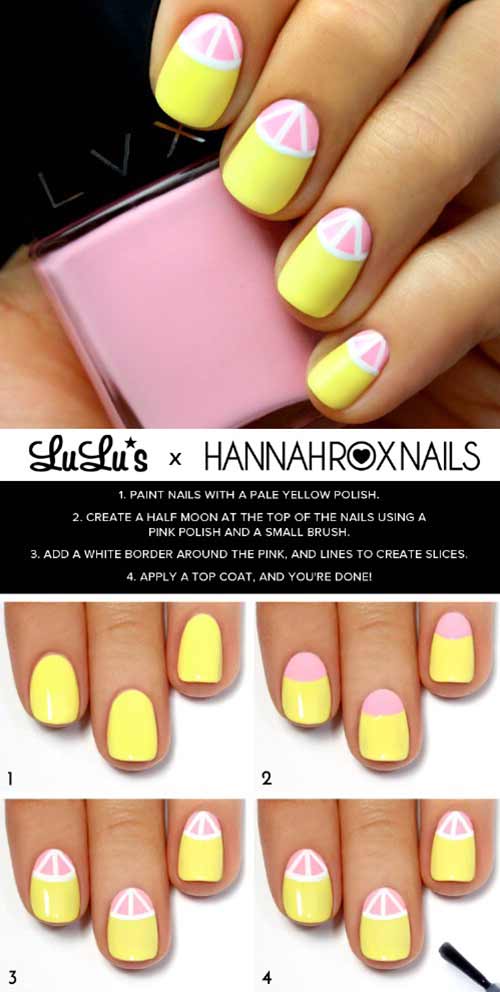
This is a super youthful nail design. The bright colours will add a pop to your most boring and bland outfits. Follow these steps to create this super pretty nail art.
Things you need:
- A bright yellow nail polish.
- A light pink nail polish.
- A white nail polish.
- A thin brush.
- A clear nail polish.
Steps:
- Apply two coats of yellow nail polish as your base.
- Place the nail art strip in a semi-circle fashion and paint it pink
- Draw some white lines with a thin brush as shown.
- Finish off with a clear polish for a glossy finish.
Halloween Skulls Nail Art
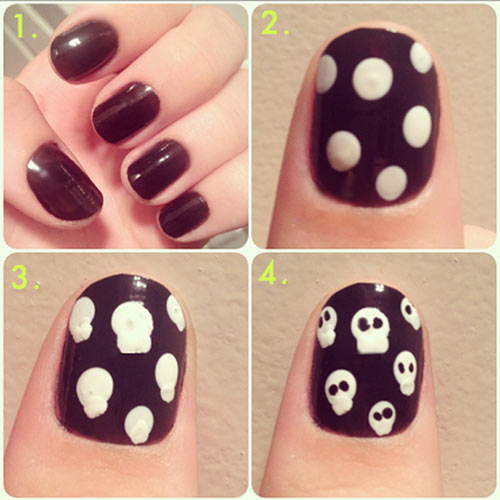
Halloween is still about to come, I know. But what about some nice friendly skulls on your nail. This design is very unique and fresh. The colours are such that they will instantly brighten up your hands.
Things you need:
- A maroon or burgundy nail polish.
- A black nail polish.
- A white nail polish.
- A thin brush.
- A clear nail polish.
Steps:
- Paint you nails burgundy for the base coat. Apply two coats.
- Draw some white skulls with the thin brush over it.
- Draw some eyes with the black nail polish.
- Finish off with a clear polish.
Hope you all liked these unique and super easy nail art tutorials. Try this at home to get your own salon like nails right at your home. For more fun tutorials stay tuned to Fashionshala.
About Author
sanjana
Pursuing my graduation in English Major. My hobbies are reading, listening to music and you tube. I am a mediator type and I find good even in the worst case scenario.