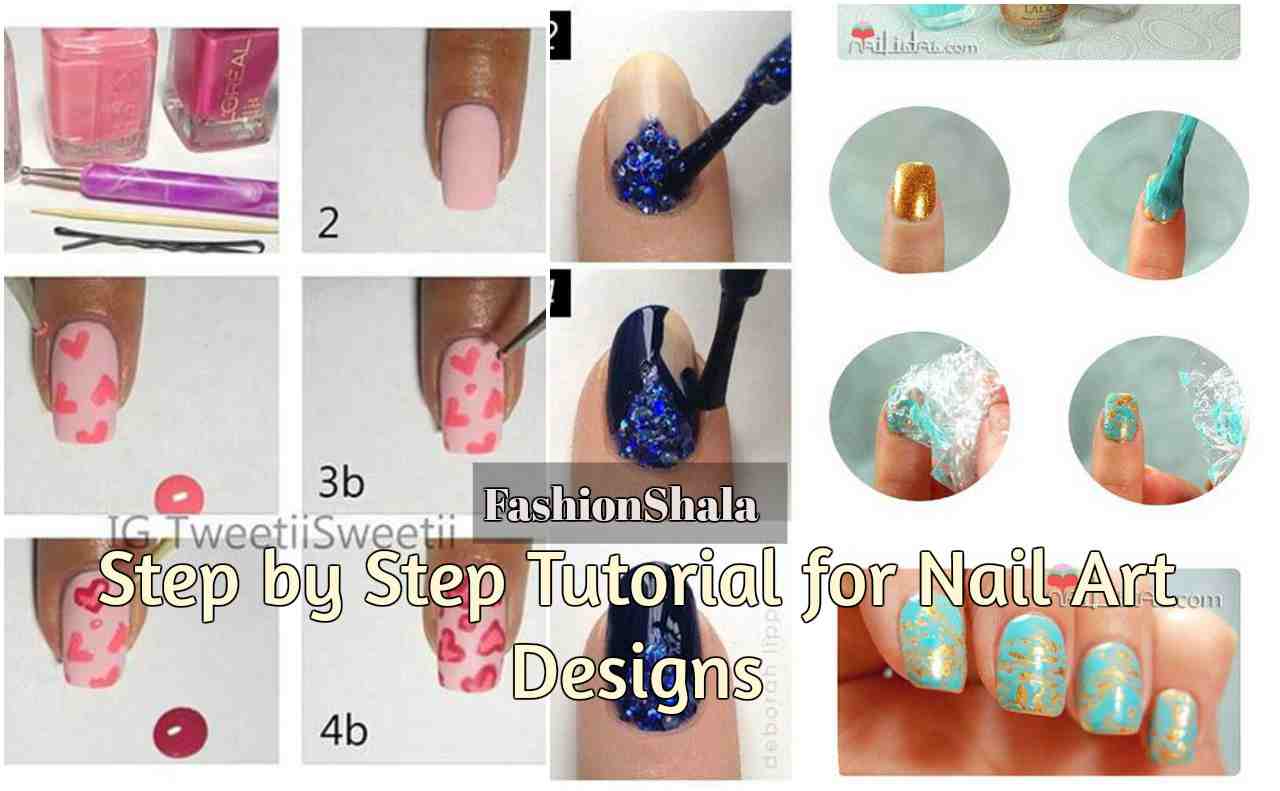
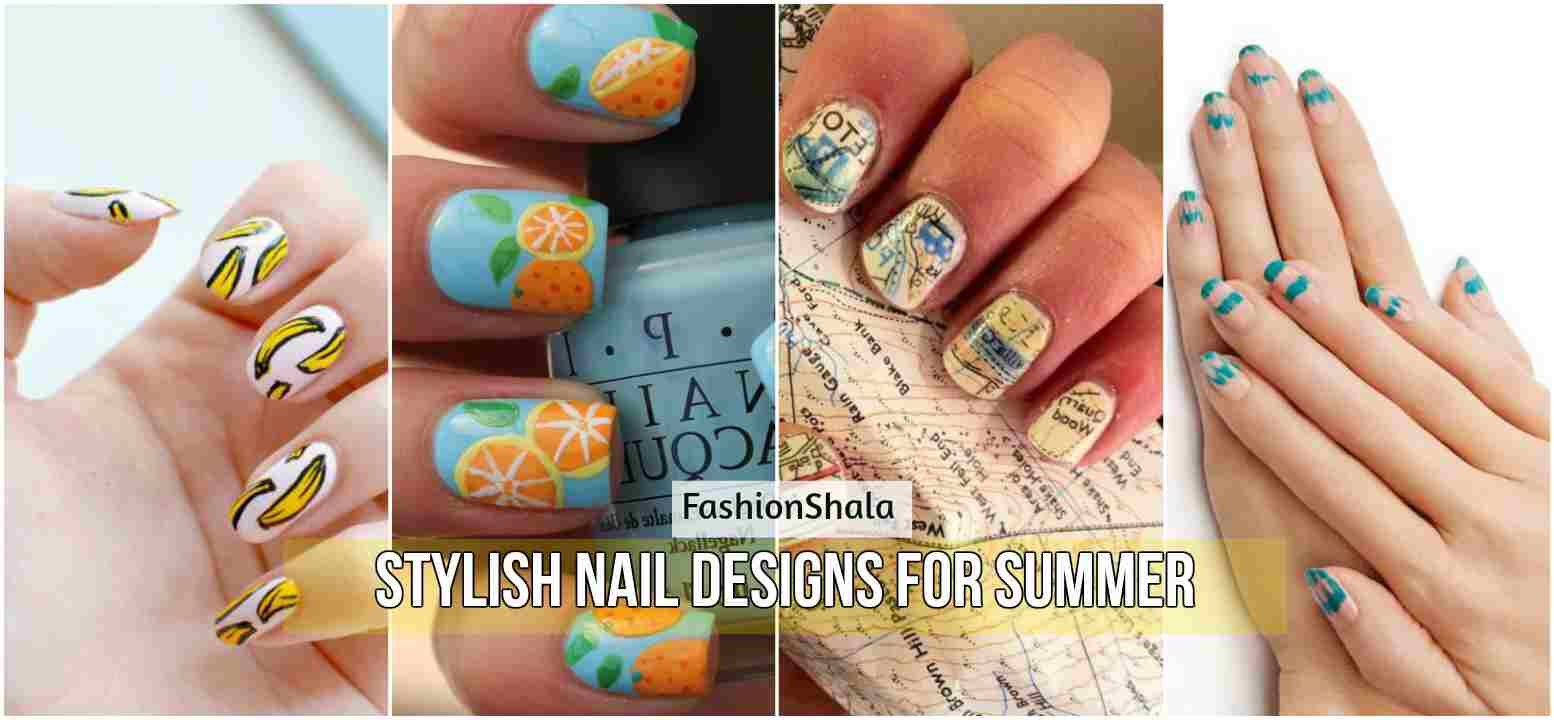
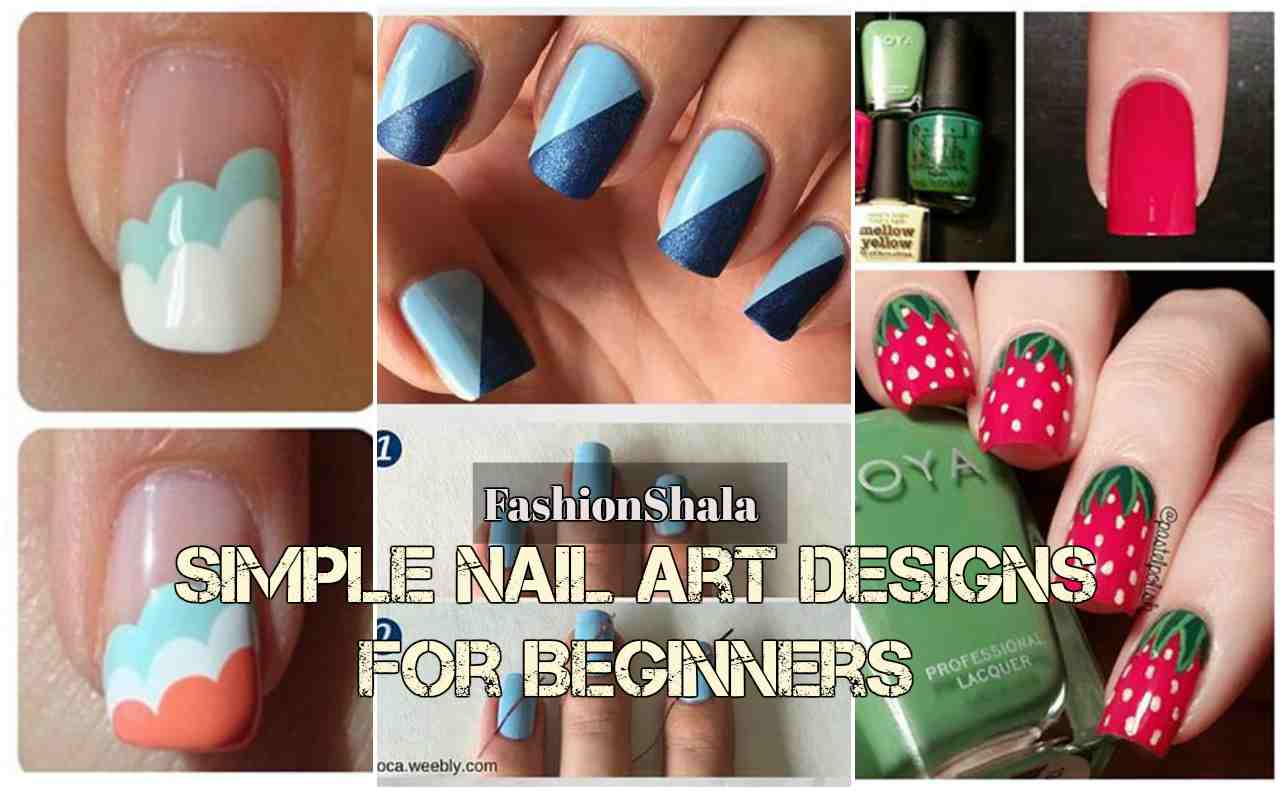
12 Nail Art Designs with Step by Step Guide
How do you feel about spending insane amount of time and money, just so your nails look good??? Fake nails, nail extensions and hours of manicure just to complement your designer outfit and personality.
Nail art is a fashion trend that is quite popular among ladies all over the world. A marvelous nail art seems to grab everyone’s attention and it also gains you a lot off compliments. Moreover, dont you love an extra pinch of glamour on your nails???
You pay so much attention in putting your best fashion foot forward in terms of garments and footwear and stuff. Why not step out of the monotony of simple and boring daily and try something funky and cool to upgrade your style.
Don’t worry guys! We are not here to dig a hole in your pockets. After all of this information you might think it is going to cost you stack of dollars to achieve pretty nails. But it is not so! We understand your pain and so we are here today to provide you some simple steps by which you can achieve the nails of your dreams right at home.
So without further delay let’s begin:
White And Orange Flames Nail Art
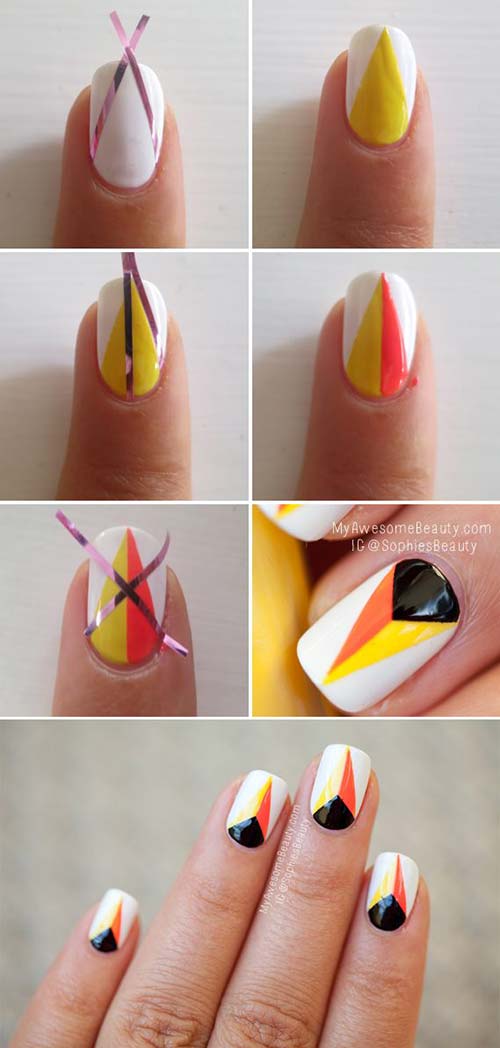
This is a simple yet very bubbly nail art. It has all those summery happy colours and everything about this nail art is bright and beautiful. Let’s see how to get this look.
Things you need:
- A white nail polish.
- An orange nail polish.
- A yellow nail polish.
- A black nail polish.
- A clear nail polish.
- Nail art strips( you can all use tape if strips are not handy)
Tip: you can use any colour of your choice.
Steps:
- Apply two coats of white nail polish as your base coat.
- Place two nail strips diagonally from across the bottom corners of your nails as shown.
- Once you get than V shape, fill it in with yellow nail polish.
- Now use the strip again and divide the yellow part in half.
- Fill that half with orange nail polish.
- Now place the strips again diagonally similar to what you did before.
- But this time toward the bottom.
- Once you get another V fill it with black nail polish.
- Pull out the strips and let it dry.
- Apply clear nail polish as your top coat and you are done.
Purple-Pink Floral Nail Art
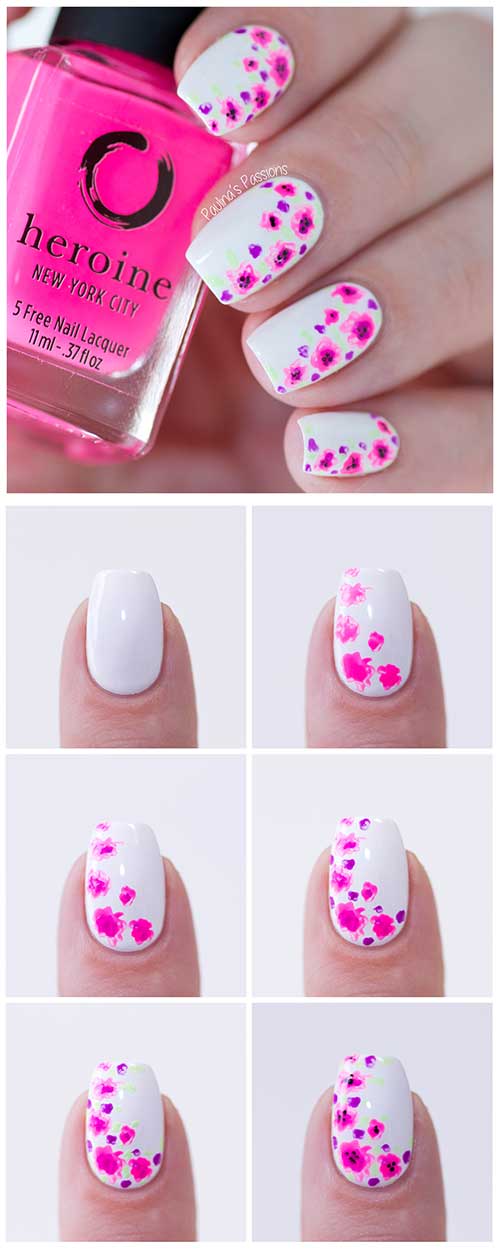
Magnificent, isn’t it?? Perfect for a beach day or even a Christian wedding. The blend of these colours and the floral motif can truly steal the show. These nails are super cute and can really brighten up your look. Let’s see how you can achieve this look at home.
Things you need:
- A white nail polish.
- A purple nail polish.
- A pink nail polish.
- A nail art pen.
- A clear nail polish.
Tip: You can use any colour to achieve this art.
Steps:
- Apply two coats of white nail polish as your base coat.
- Take your nail art pen and create small flowers starting from the bottom to one side of your nails.
- Now take purple nail polish and create some further smaller designs to give your art a little more pep.
- Let it dry and finish off with a clear nail polish as your top coat.
Color Splash Nail Art
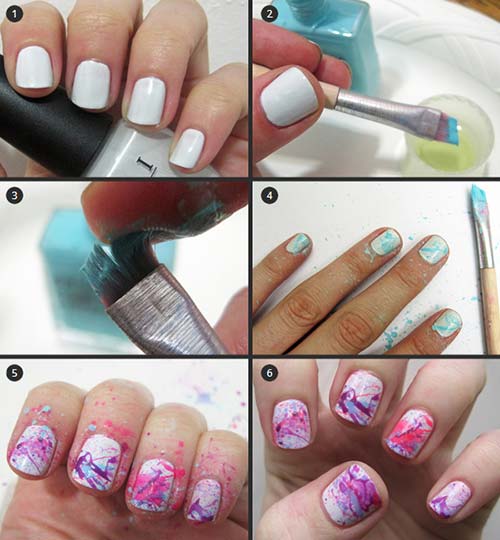
Spray paint your nails just how you would paint a blank canvas. Already feeling like Picasso?? If you don’t yet, you are just about be. Let’s see how.
Things you need:
- A white nail polish.
- A blue nail polish.
- A purple nail polish.
- A pink nail polish.
- An angled paint brush.
- A clear nail polish.
Tip: You can use any nail polish to create this effect.
Steps:
- Apply two coats of white nails polish as a base coat.
- After it is dried, dip your brush inside your blue nail polish and using your thumb cover your nails with the paint.
- Do the same with purple and pink nail polish.
- This will create a spray paint effect.
- Once it dries finish off with a clear nail polish for the top coat.
Colorful Clouds Nail Art
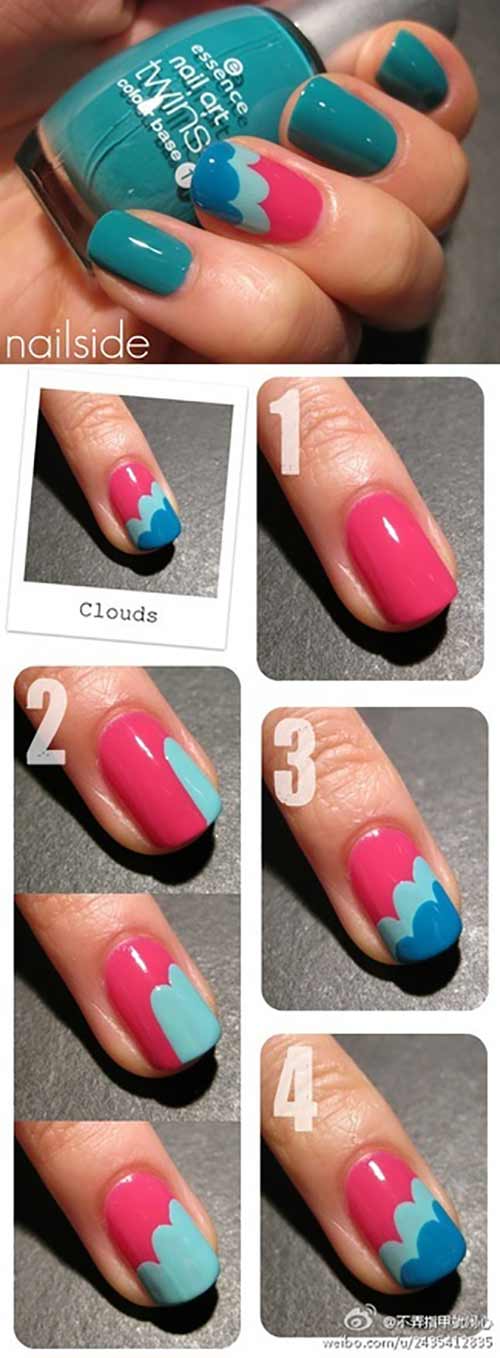
Interested in holding some clouds in your hands?? I know you are! This nail art is super cute. All the bright pop of colurs is perfect for the hotter weather. Let’s see how to do this.
Things you need:
- A greenish- blue nail polish.
- A light blue nail polish.
- A dark blue nail polish.
- A pink nail polish.
- A clear nail polish.
- A thin painting brush.
Tip: You can use any colour of your choice to create this look.
Steps:
- Apply the greenish-blue nail polish on all your nails except the ring finger.
- Paint your ring finger with pink nail polish.
- Take the brush and make the clouds. Dip it in the light blue nail polish and draw vertical lines as shown in the picture.
- Draw the lines in shape of clouds.
- Let it dry then repeat the same thing with the dark blue nail polish as shown.
- Once it dries finish it off with a top coat of clear nail polish.
Diagon-Alley Pink And Yellow Nail Art
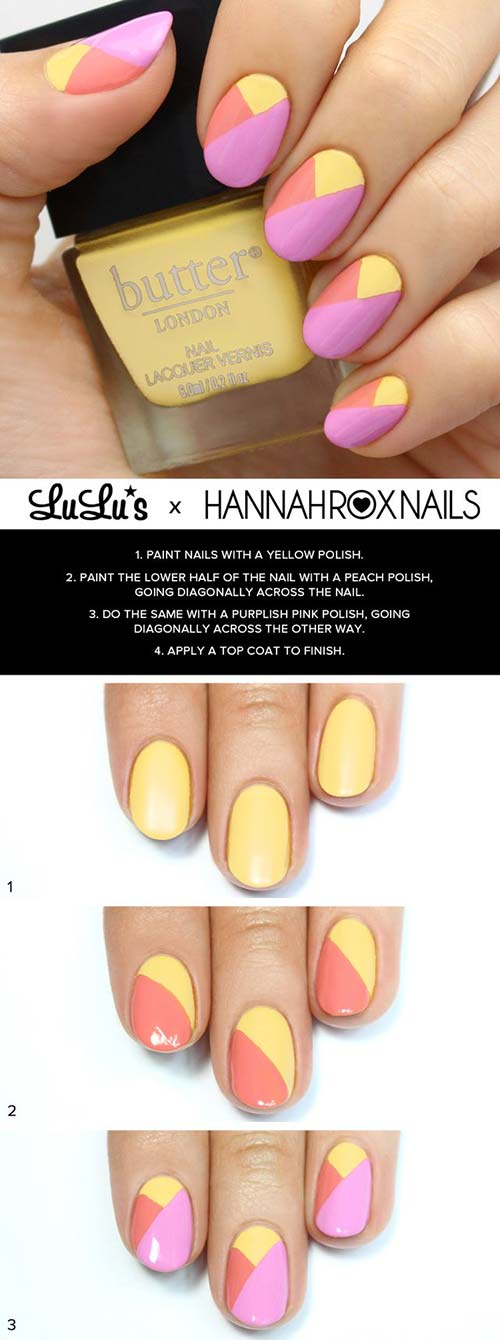
Everything about this nail art is so artistic! The bright colours are so vibrant and youthful. This nail art can instantly brighten up even the most boring day of yours. Let’s see how to do this.
Things you need:
- A yellow nail polish.
- A peachy nail polish.
- A pink nail polish.
- A clear nail polish.
- Nail art strips.
Steps:
- Paint all your nails yellow.
- Put a nail strip diagonally and fill it in with peach nail polish as shown.
- Now take the strip again and repeat the same thing.
- Then paint the area with pink nail polish.
- Let it dry and finish off with a top coat if clear nail polish.
Plastic Wrap Nail Art Design
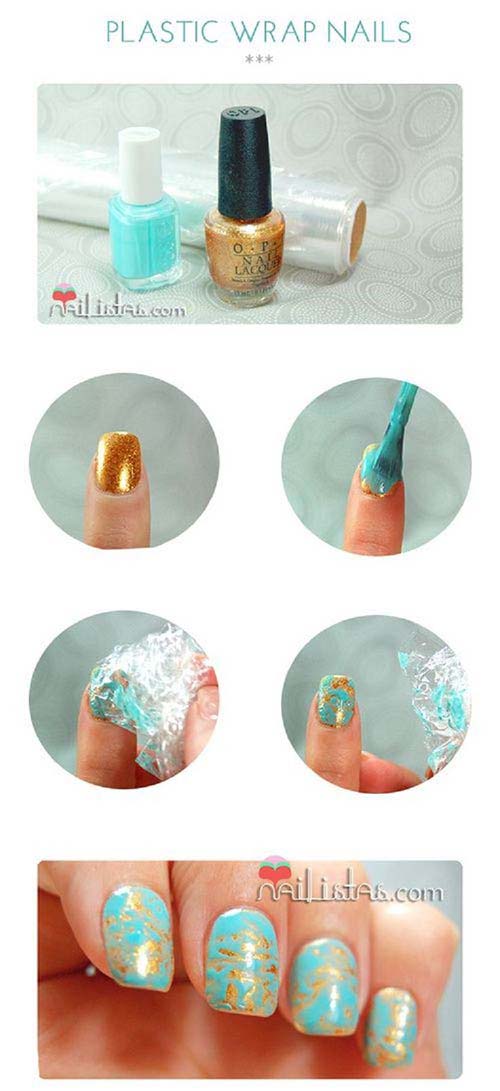
The blend of blue and gold is quite awesome. This is perfect when you want to add a statement look to your outfit. And the bonus is you dont even have to spend money. A plastic wrap is enough. Nothing can be cheaper than this,right?? Let’s see how to do this.
Things you need:
- A shimmery gold nail polish.
- A light blue nail polish.
- A plastic wrap.
- A clear nail polish.
Steps:
- Start by painting all your nails with the shimmery golden nail polish.
- Let it dry then put on the light blue polish.
- While it is still wet dab a plastic wrap over it as shown until you see the gold nail polish peeking out.
- Let it dry and finish off with a top coat of clear polish.
White Minimal Chevron Nail Art
![]()
This is the simplest of all. Trendy and beautiful this is my absolute favourite. There us everything pretty about white. This makes you look chic and put together. Let’s see how.
Things you need:
- A white nail polish.
- Nail art strips.
- Clear nail polish.
Steps:
- Start by putting the nail strips in a triangle form as shown.
- Do 3 tiers.
- Then paint your nails with white polish.
- Pull out the stripes gently while it is still wet.
- Finish off with the top coat if clear polish.
Striped Aztect Nail Art
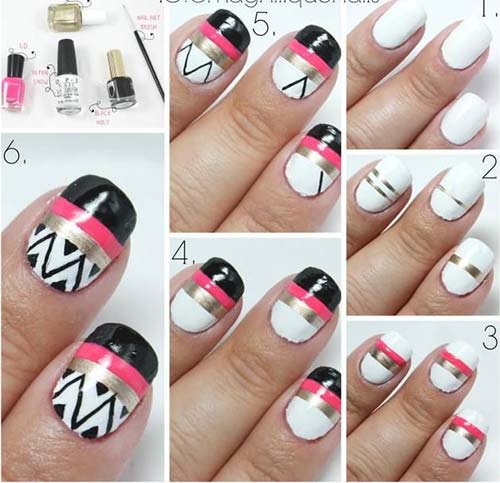
This nail art is more on the boho chic side. The infusion of all the colours make it stand out. The Aztec design adds a touch of glamour to your personality. Let’s see how to do this.
Things you need:
- A white nail polish.
- A black nail polish.
- A pink nail polish.
- A golden nail polish.
- A thin brush.
- Nail art strips.
- A clear nail polish.
Steps:
- Start painting your nail with white nail polish as your base coat.
- Use the nail stripes to create golden stripes as shown.
- Do the same thing with pink nail polish.
- Then create some black stripes using the same method as shown.
- Use the brush to create the Aztec design as shown.
- Let it dry and finish off with a top coat.
Pink Ombre Nail Design
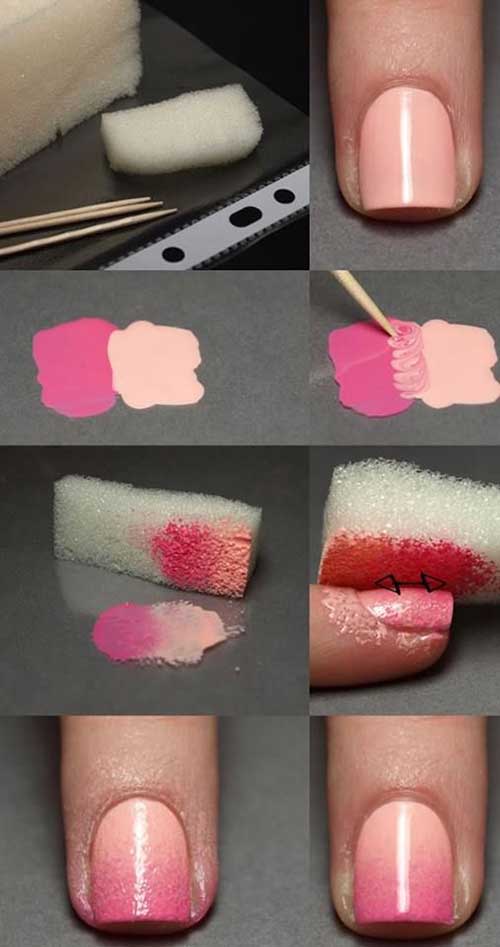
This a very trendy and latest nail art designs. You must buy fake nails from the market to get this eeffect.i know I did. This even looks best in black and maroon colour. Let’s see how to do this without wasting money.
Things you need:
- A peach coloured nail polish.
- A pink colour nail polish.
- Gradient sponge.
- Toothpick.
Steps:
- Start by painting your nails with the peach coloured nail polish.
- Take a little bit of both the nail polish on a clean surface.
- Use a toothpick to slightly blend the two of them.
- Dab the sponge on the mixed nail polish.
- Slightly dab the sponge on the nails as shown to create the gradient effect.
- Once it dries finish off with a top coat.
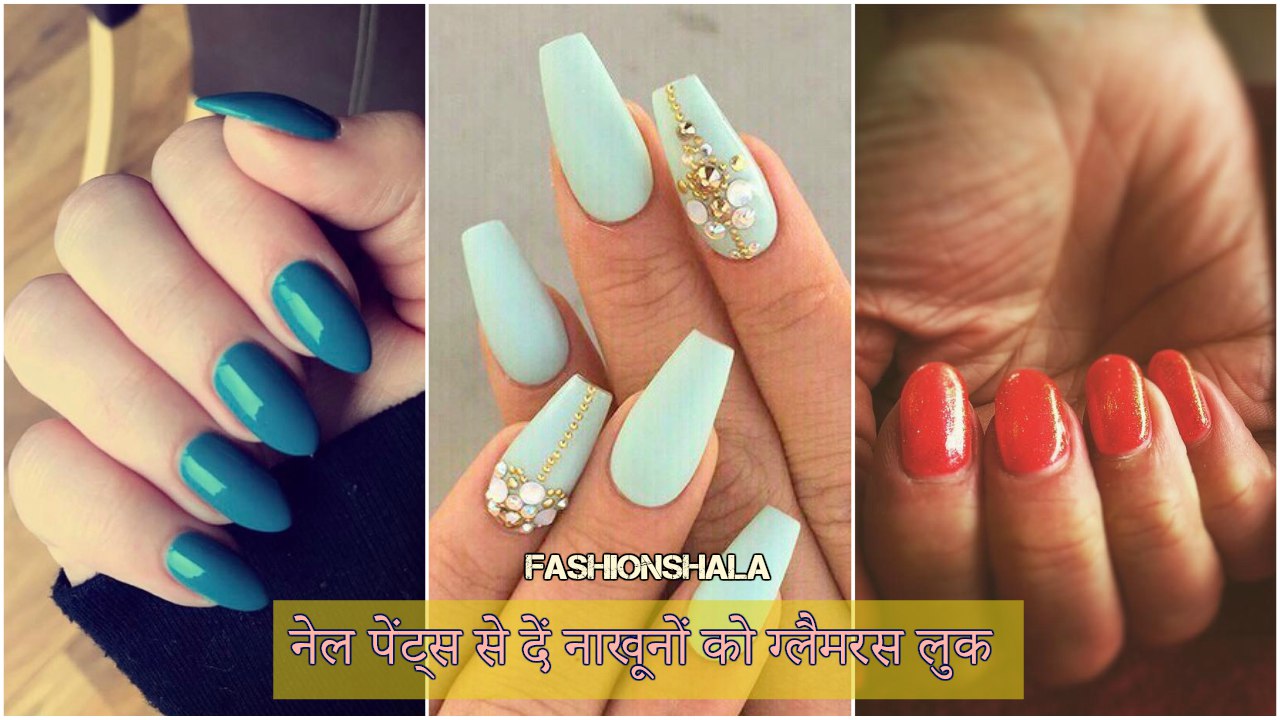
Gold Glitter Nail Art
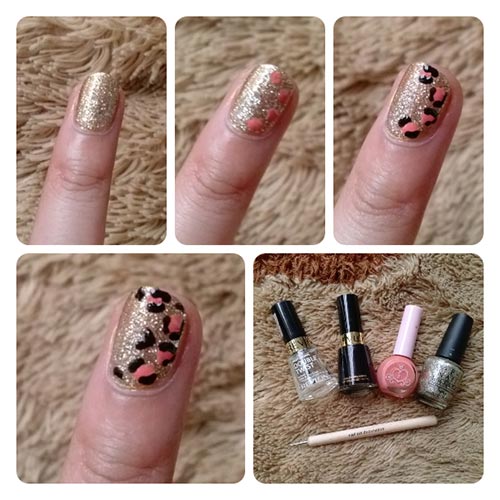
Who doesn’t like a little bit of shimmer?? Sequins and shimmers are so in trend right now. Then why not add a little bit of shimmer to your nails. This look is perfect for your glam parties. Let’s see how you could get this.
Things you need:
- A glittery gold nail polish.
- A black nail polish.
- A pink nail polish.
- A dotting tool.
- A clear nail polish.
Steps:
- Apply two coats of gold nail polish.
- Take the dotting tool and dip it on the pink nail polish.
- Make some pink dots as shown in the picture.
- Outline the pink dots with black nail polish as shown.
- Let it dry and finish off with a top coat.
Smokey Grey Nail Art
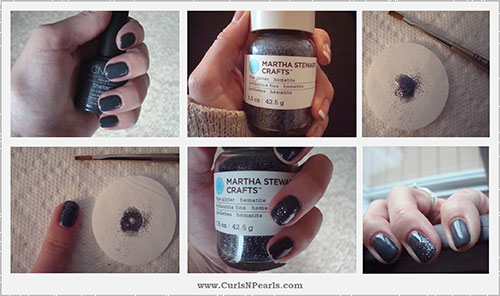
This nail art reflects the goth side of you. This nail polish will imply something dark and mysterious about your personality. Dark as it is, it is an absolute stunner. Let’s see how to achieve this fabulous nails.
Things you need:
- A dark grey nail polish.
- Glitter of the same colour.
- A brush.
- A clear nail polish.
Steps:
- Apply two coats of the dark grey nail polish.
- Pour some glitters on a clean surface and mix it with some nail polish.
- Take the brush and apply this on top of your nails as shown.
- Let it dry and finish off with a top coat.
Chocolate Gold Nail Art

Sophisticated and chic, this nail art does it all. This makes you look so much put together. Let’s just admit it looks pretty yummy too. I mean who doesn’t love chocolates?? Let’s see how to do this.
Things you need:
- A chocolate brown nail polish.
- A gold nail polish.
- Tape.
- A clear nail polish.
Steps:
- Start painting your nails with two coats of brown nail polish. Let it dry.
- Put the tape over your nails as shown.
- Fill the V with gold nail polish.
- Let it dry and finish off with the top coat.
I am sure all of you liked this nail art session. Simple and easy plus it saves a lot of your money. Try out these simple steps and say hello to fabulous nails. For more updates stay tuned to Fashionshala.
About Author
sanjana
Pursuing my graduation in English Major. My hobbies are reading, listening to music and you tube. I am a mediator type and I find good even in the worst case scenario.